PPN.fm - Photo Podcast Network
  • Home
  • Podcasts
  • Photography & Gear
  • Sponsor/Advertise
  • About Us
  • Contact
  • Privacy & Cookies
  • Home
  • Podcasts
  • Photography & Gear
  • Sponsor/Advertise
  • About Us
  • Contact
  • Privacy & Cookies
Search by typing & pressing enter

YOUR CART

Picture

Let's talk about Gear

Use the right gear for the right purpose...

Picture

Use the Code "PHOTOPODCASTS" for your Luminar Discount Code 


4/26/2017 0 Comments

​Panasonic 12mm f/1.4 ASPH Leica DG SUMMILUX Lens - Quick Look

Picture

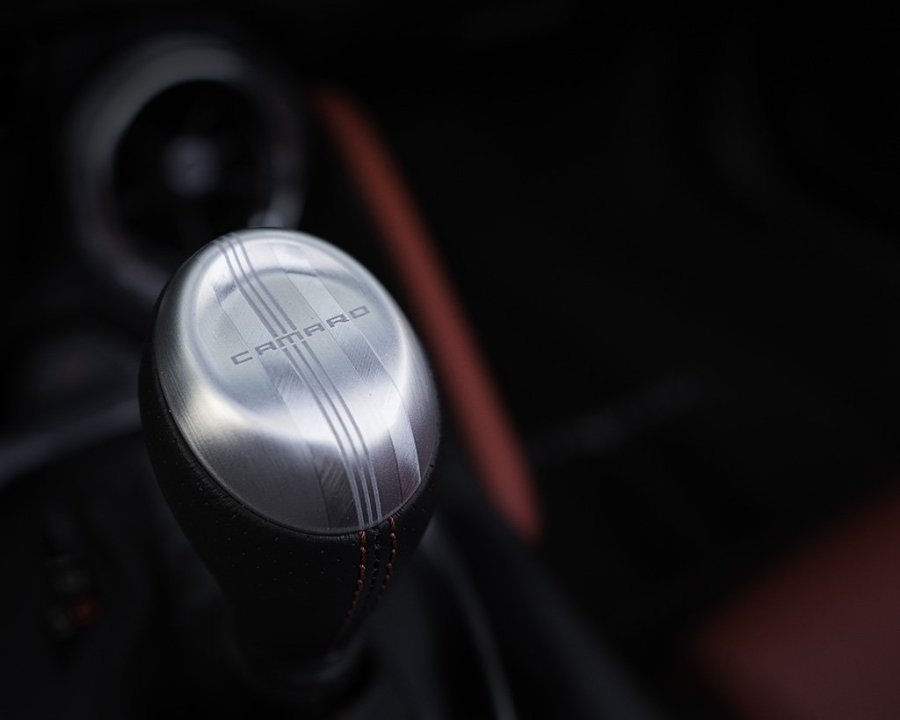
Copyright Scott Bourne – shot wide open at f/1.4 (Panasonic GX8 – ISO 200 – 1/320 sec – hand held) with Panasonic Leica DG Summilux 12mm f/1.4 lens

DISCLAIMER: Crop factor and the associated focal length multiplier only affects field of view. I prefer to reference this as effective focal length but others use FOV. Feel free to use whichever term you like.

If you love a smooth, creamy bokeh, and you own a Micro Four Thirds (M43) camera, pay attention. THIS is the lens you really want. 

It comes from the very interesting pairing of Panasonic and Leica. There are several co-branded (and fantastic) lenses in the Panasonic lineup that are worth a look and Leica has a lot to do with that. Let’s face it – Panasonic was smart to team up with the Germans. Let’s also just get this out of the way. When Leica is involved, you can immediately assume that this is going to be something fantastic. I have owned a few Leica cameras and lenses during my lifetime and every single time I touch Leica glass I feel lucky. It’s just special. When I found out about the Panasonic/Leica lenses I got very excited because I knew these lenses would be very good but, also affordable (comparatively speaking.)

This super wide lens from Panasonic/Leica is luxurious – that is the only word I can think of to describe the Panasonic 12mm f/1.4 ASPH Leica DG SUMMILUX lens for M43 cameras.

Product Highlights

This is a very special lens indeed. With an equivalent focal length of 24mm, the Lumix 12mm is the widest angle lens in the Panasonic lineup (short of fisheye lenses.)

Like all lenses that contain the word Leica, it’s expensive. Great stuff usually is. At just under $1300 it’s one of the most expensive M43 lenses you can buy. Why so expensive? You can surmise all the usual reasons but let’s start with the basics. It’s a 12-ounce, small, well-built, piece of glass offering supreme optical performance with a fast f/1.4 aperture and that will get you a higher price tag every time. But compare that with native Leica glass and you can see it’s not THAT expensive.

In the end, the most important point to be made about price is this. If it’s worth it, and you can afford it, who cares? This lens is worth it. In my initial tests, (not using scientific machines but just my highly-trained eye) I can see almost no chromatic aberration, very minor vignetting and no noticeable distortion. Even wide open! That is remarkable in a lens of this focal length.

The lens is stupid sharp, even at f/1.4. You might (MIGHT) notice some minor softness in the corners if you zoom in to 200% and look for it but it is essentially a non-issue and even the most ardent pixel peeper won’t find the slightest bit of softness by somewhere between f/2 and f/2.8. Refraction starts around f/8. (Note the stitching on the Camaro shifter at f/1.4 – very sharp and detailed.)

On my test camera (a Panasonic GX8,) autofocus is blindingly fast and also very quiet. The quiet bit will be important to those who use their M43 camera for video.

While I am constantly told in the camera forums that M43 lenses can’t deliver a beautiful bokeh, I can tell you that is simply not the case here. The Summilux 12 offers a lovely bokeh and I can’t think of a way it could be better.

Build quality, is as you would expect, very rugged and the lens has the added benefit of being splash/dustproof. The lens mount, the barrel and yes – the hood – are thankfully – all made of metal.

There is a traditional manual aperture ring on the lens barrel, which allows you to set the aperture in 1/3 steps. There are full aperture markings from f/1.4 to f/16 and the manual focus ring is easy to operate.

Conclusion

I have really enjoyed playing with this lens. I look forward to giving it a more detailed test later. Every time I mount it to my camera, a huge smile starts to creep across my face. It’s a true joy to use.

If you buy a fast, very wide-angle lens, you probably want to shoot it wide open as much as possible. I can’t think of any other lens in this class that allows you to do that any better than the Panasonic 12mm f/1.4 ASPH Leica DG SUMMILUX. The new 12 (and the Panasonic LUMIX G Leica DG Nocticron 42.5mm f/1.2 ASPH Power OIS Lens) are big parts of why I think people should consider switching to M43. This glass is THAT good.

I’ve run out of superlatives to describe this lens. It’s hands-down one of the best lenses in this focal range I’ve used. If you can afford it – buy it. Because it works on any M43 camera, it is a safe, long-term investment that will probably outlast you. Highly recommended.

Product Details:

Micro Four Thirds System
24mm (35mm Equivalent)
Aperture Range: f/1.4 to f/16
Two Aspherical Elements
One ED Element, Two UED Elements
Weather-Resistant Construction
Rounded 9-Blade Diaphragm
0 Comments

4/24/2017 3 Comments

​Micro Four Thirds camera Gear For Bird/Wildlife Photographers

DISCLAIMER: Crop factor and the associated focal length multiplier only affects field of view. I prefer to reference this as effective focal length but others use FOV. Feel free to use whichever term you like.

I used to primarily rely on Canon or Nikon DSLRs for bird and wildlife photography but my health and my age have made both impractical. Thankfully, Micro Four Third (M43) cameras and lenses have improved over the last five years to the point where they have significantly closed the gap with many DSLRs.

The Micro Four Thirds gear can’t deliver the low-light performance of the DSLRs and it’s a tad bit behind when it comes to autofocus, but there are some obvious benefits too.

The M43 gear is smaller, lighter and less expensive than the full-frame DSLRs. The M43 can match the image quality of the DSLR when there is sufficient light, and can even do a good job of tracking birds in flight. After four months of using M43 gear almost exclusively I am certain that in the right hands, it can hold its own against most DSLRs.

Good technique can yield good results with most cameras but I am particularly impressed with the Olympus OM-D E-M1 MK II camera body. It’s lightweight, powerful and affordable (compared to top-shelf DSLRs) and there is a full lineup of lenses for any task. The Olympus has tracking autofocus that can work and using a mechanical shutter can deliver 18FPS - 60 FPS with an electronic shutter. It has sufficient battery life to capture a full session of photography and the image quality is superb.

The lenses that bird/wildlife photographers crave are available in M43 format. The Panasonic Leica DG Vario-Elmar 100-400mm f/4-6.3 ASPH. POWER O.I.S. Lens, matched with any M43 camera, gives you a stabilized telephoto lens with a 35mm equivalent focal length of 200-800mm! This lens costs under $1800, has a close focus distance of about 4.5 feet and weighs in at just over two pounds. Imagine a FF lens with those specs. Then imagine a price tag of $15000! You can also imagine a lens that weighs north of 10 pounds and is AT LEAST a couple feet long!

Another great lens for the M43 format is the Olympus M.Zuiko Digital ED 300mm f/4 IS PRO Lens. It’s a $2500, stabilized telephoto lens with an EFL of 600mm at f/4! It also pairs well with an Olympus M.Zuiko Digital MC-14 1.4x Teleconverter to get you an EFL of 840mm in a hand-holdable lens that costs about 1/5th it’s full-frame equal!

Lastly my new favorite lens for birds-in-flight is the Olympus M.Zuiko Digital ED 40-150mm f/2.8 PRO Lens. This lens is super sharp and lightweight enough to hand-hold all day long. The effective focal length of 80-300 is perfect for many wildlife situations and it's a very fast lens at f/2.8 which means in low-light situations you can still make great images with it.

Being able to hand-hold lenses that allow you to fill the frame with distant subjects is amazing. If you want to use a tripod you can also get by with any old ball head on your tripod. While a gimbal head always helps, (NOTE: I used to use a heavy WImberly Gimbal head and now have switched to a much lighter Jobu Design BWG-J3K Jobu Jr.3 Gimbal Kit with Swing-Arm HM-J2. Since using either of these much lighter lenses don't require as much support, I can use the lighter/less expensive Jobu head.) Another advantage of these lenses is that I can often get by using my Gitzo GM2562T Series 2 Traveler Carbon Fiber Monopod (which weighs less than one pound) with fantastic results.

I have made some great portraits and birdscapes with this gear and even made some salable prints from the RAW files I get from the Olympus. There's no reason to fear the image quality from it and other top-quality M43 cameras like the Panasonic Lumix DC-GH5. For some, there is no other option. Many people who love birds and wildlife photography simply can’t carry or effectively wield the large, heavy full-frame gear that most associate with such photography. There are also lots of challenges associated with traveling with long lenses. And let's not forget cost. Some people can’t come up with the $20-$30k that it costs to grab a couple of high end DSLR bodies with telephoto lenses.

If you need to save space, weight or money, and/or want some gear that is easier to travel with yet grabs great images, rest assured that the Micro Four Thirds gear I’ve discussed here will get you some great results. You may have to work a tiny bit harder to get winning shots, but you can absolutely do it. If I can do it – you can too!
Picture
Picture
Picture
Picture
Picture
All images made with Olympus OMD EM1 MK II camera.
3 Comments

4/21/2017 0 Comments

Announcing the first ever Photo Podcast Network Twitter Contest

Picture


​


Welcome to the PPN (Photo Podcast Network) Twitter Contest. This contest starts April 21, 2017 and ends on May 30, 2017.

​The winner gets:

Prizes: A brand new, THINK TANK AIRPORT HELIPAK V2.0 BACKPACK

(PLEASE READ THIS PAGE CAREFULLY IT ANSWERS ALL YOUR LEGITIMATE QUESTIONS ABOUT THE CONTEST!)

Heres how to enter.

– Follow @Photopodcasts on Twitter (http://www.twitter.com/photopodcasts)

(If you are already following no need to unfollow and refollow doing so repeatedly will get you permanently blocked and banned from our contests.)

– Tweet the message you see highlighted below once! (There is no advantage to tweeting more than once. There is also no penalty for tweeting more than once, but you won’t have any better chance of winning and you may anger your own Twitter followers if you decide to tweet more than once. Please keep track of your own entry. We can’t (and won’t) respond to requests asking about entry status.)

Here is the Tweet:

“Follow @Photopodcasts for a chance to win a new AIRPORT HELIPAK V2.0 BACKPACK. RT this tweet for a second chance to win.”

That’s all there is to it. All of our followers are automatically eligible as long as they meet the criteria below. Those who re-tweet about the contest receive a second entry.

Official Rules: 

No purchase necessary to enter or win.

1. You must be 18 years or older to enter
3. You must send out the above tweet EXACTLY as it appears. A failure to do so will disqualify you.
4. Residents of Quebec are not eligible to enter or win. The contest is null and void if it violates your local laws.
5. The winner isresponsible for taxes (if any) incurred as winner. If you live outside the US you are responsible for any custom duties and shipping in the event you win. If you have a US mailing address ground shipping is free. 
6. If users make lots of Twitter accounts in order to enter a contest more than once, they’re liable to get all of their accounts suspended. Anyone found to use multiple Twitter accounts to enter will be ineligible.
7. The winner will be randomly selected on May 30, 2017 by 6pm PST and notified via the photopodcasts.com blog and also via the @ScottBourne and @Photopodcasts Twitter accounts. Winner has 48 hours to claim their prize. In the event they fail to do so another winner will be drawn at random and so on until the prize is claimed.
8. You must have a free Twitter account to qualify for this contest. There is no other way to enter.
9. The odds of winning depend on the number of entries received.

As always, if you are not a fan of such contests, please don’t participate. For those of you who do enjoy the contests, we’ll continue to try to find new prizes that will make it fun and interesting to be a part of the PPN family. Thanks for your support.

NOTE: We reserve the right to substitute a different prize of equal or higher value in the event the prize becomes unavailable or to offer a cash equivalent paid in U.S. dollars to any winner.

Due to the volume of e-mail we receive we cannot respond to individual inquiries about the contest. Please re-read the rules if you are unsure of how to proceed, everything is spelled out right there. 

Thank you.

0 Comments

4/20/2017 0 Comments

More Gear show podcast #1 is now live in the feed!

Picture
Very happy to report that the More Gear Show Podcast has launched. You can find episode #1 right here at http://www.photopodcasts.com/podcasts/more-gear-show-1-ppn-april-20th-2017

0 Comments

4/18/2017 21 Comments

​Olympus OMD EM1 Mark II – Micro Four Thirds Camera - Long Term Test

Picture
. 
NOTE: All photos and text in this post are Copyright Scott Bourne 2017, All Rights Reserved and all images were made with the Olympus OM-D E-M1 MK II camera.


DISCLAIMER: Crop factor and the associated focal length multiplier only affects field of view. I prefer to reference this as effective focal length but others use FOV. Feel free to use whichever term you like.

——————————————--

I have been using Micro Four Thirds cameras on and off for seven years now. I have used both Olympus and Panasonic M43 cameras. Currently, I am shooting 100% of the time with Olympus gear.

I have been using the OM-D EM1 MK II for four months now. I have made more than 10,000 exposures with the new Olympus and am confident that I can fully evaluate it’s strengths and weaknesses. If you just want to know whether or not I still like it after four months of heavy usage, the answer is a resounding yes. Keep reading to get the details…

I love small, lightweight, inexpensive, powerful cameras. I like these cameras so much that in the summer of 2013 I released a lynda.com training title with my pal Rich Harrington called Up & Running With Micro Four Thirds Cameras. (Updated in 2015.)

But when it comes to M43, even though my heart is in it, my head hasn’t been because of three things:

1. Lack of long lenses
Initially, M43 cameras simply didn’t come with lenses that were fast enough, long enough, or sharp enough for me to get the subject as large in the frame as I need it to be when I shoot birds. The system lacked a super high-quality 600mm lens. The big zooms for M43 cameras were also too slow and not contrasty enough for my taste.

That has been rectified “bigly” by the superior Olympus M.Zuiko Digital ED 300mm f4.0 PRO Lens which, when paired with an Olympus MC-14 1.4X Teleconverter gives me an equivalent focal length (EFL) of 840mm. It’s sharp and fast to focus either way.

When it comes to zooms, the Olympus M.ZUIKO 40-150mm f/2.8 PRO Lens and the Panasonic LUMIX G LEICA DG VARIO-ELMAR, 100-400mm, F4.0-6.3 ASPH Lens offer anywhere between 80-300 f/2.8 (EFL) and 200-800mm f/4-6.3 (EFL) respectively.

All the aforementioned lenses are top-notch with great handling and all have solved my lack of long lenses in M43 problem.

2. Lack of sufficiently reliable and fast continuous autofocus
I couldn’t get autofocus that would allow me to get the kind of results as a bird photographer I’ve come to expect out of flagship DSLRs like the Canon 1DX MK II. Most M43 systems autofocus quite well on static subjects, but when it comes to birds in flight they simply can’t cut it.

The new OM-D: Olympus E-M1 Mark II camera body has solved that problem. While it won’t catch up with the AF on the newish Canon 1DX MK II, it also doesn’t cost $6200 and doesn’t weigh half a ton. And it’s very good. When you practice with it, learn how it works, how to deal with it (as you’d be required to do with any sophisticated AF) you can tune it to your liking and coax results that approach what top-of-the-line, full-frame DSLRs could do just a few years ago. The Olympus OM-D E-M1 Mark II comes with an entirely new autofocus system, featuring 121 on-sensor phase-detection points. There is one in-camera processor exclusively devoted to AF so it’s really very good. Even in bad light it acquires focus quickly. In my opinion the AF problem is hereby solved and it will only get better.

For right now, as is, it is still very good. Birds in flight will always be one the hardest things for any camera to track with AF. They are usually small, fast, and can change directions on a dime. They can soar very high and dive like a bullet. All this is tough to capture by even seasoned bird photographers using the best cameras on the market.

I spent weeks shooting birds with the new camera and experimenting with the new AF. It is definitely the best autofocus system I have tested on ANY mirrorless camera. The continuous AF with tracking actually works. It does take some getting used to and it’s not the kind of AF that you set and forget. You need to massage the best results out of it depending on the situation. For instance, photographing a bird flying high above the water or against a blue sky without distractions you can enable all 121 AF points and the tracking system is rock solid. Now if the bird is flying just above the water and there are small waves that rise up to meet the bird, then the all-points AF doesn’t work. The tracking gets fooled and jumps to the waives. So you have to narrow the use of AF points to single or a group of five (which works best for me so far.) In any event, like any sophisticated tracking AF, you need to learn how it works and then be ready to change it depending on conditions. It would be more helpful if in the next FW update Olympus changed the way you interact with these choices by giving them USE CASES much the way Canon has done on its flagship bodies.

There is one quick tip I got right from the manual but not fully realized until significant field use that should have come to me earlier. Using the MK II in continuous AF with tracking if you press the shutter button halfway to focus; the camera then tracks and maintains focus on the current subject while the shutter button is held in this position.

The AF target is displayed in red if the camera can no longer track the subject. Release the shutter button and then frame the subject again and press the shutter button halfway. Some people call this bumping the focus.

In practice I’ve found that in situations where the camera can’t maintain tracking, you can stick with the subject and maybe the camera will pick it back up but if you let go of the shutter button and quickly re-press the button half-way nearly 100% of the time the camera re-establishes focus instantly rather than waiting on the camera to sort it out on the original press. It’s a fine point but in practice it works.

I find myself re-pressing much more often than I would with something like the Canon 1DX MK II, but the results are similar. Simply press and re-press OFTEN you will improve your keeper rate by 10-15%.

In any event, with a high degree of success, you can track and shoot birds in flight using this camera. I have never said that about any other mirrorless camera and up to now, it’s only true of the OM-D E-M1 MK II.

3. Lack of sufficient image quality to print 30×40” prints
Lastly, image quality (while excellent) hasn’t been sufficient some times for the really big prints I often make of my bird photography. I can make 20×30” prints from the legacy flagship M43 cameras but rarely am I happy with the results I get when printing longer than 40” on the longest side.

The new OM-D: Olympus E-M1 Mark II camera body has also mostly solved this problem. Literally the first thing I did was take a picture of my handy-dandy test chart (it’s actually my business license) and print it 30×40”. It looks pretty darn good, especially at appropriate viewing distance. There is noticeable improvement in small details over image files made using previous versions of this and other top M43 cameras. The level of detail from this sensor is just stunning. Even at high ISOs there is good detail. The camera does not have an anti-aliasing filter and this seems to translate to more information. No filter means you will run into occasional color moiré but it’s very easily controlled in post and I find it to be a non issue. I am used to this performance in flagship, full-frame DSLRs but not on a Micro Four Thirds camera. Look at some of these pictures. They were shot in a variety of lighting conditions but all show an amazing level of detail. You can print big from these files without fear that the print will go soft on you.

The overall IQ is great with good color rendition and good contrast. Physics will limit the ability of these cameras based on sensor size but all other limits appear to have been well-defeated by the new back-end image processing on the chip.

I could stop right there and be happy with the new OM-D but there’s more to brag on.

The handling is great. The battery life is the best I have ever seen on a Micro Four Thirds camera. In fact, battery life approaches the same experience you would have with a top DSLR. I shot for 15 straight days in Alaska recently. It was very cold. I never needed more than two batteries in a day and most of the time was able to get by with one, charged mid-day for two shooting sessions. Even with EVF and IS, these new cameras offer great battery life. 

I also love the new in-body stabilization when worked in conjunction with a stabilized lens. Let’s just say I won’t be bringing a tripod NEARLY as often as I used to on my future field trips. In most cases a small, lightweight monopod is more than enough. I shot extensively in both San Diego and in Alaska with just a monopod and got some great images. I find my confidence in shooting handheld is greatly enhanced after four months of usage and I don’t get tired handholding as quickly as I would if I were still shooting a heavy duty DSLR.

The camera is very sturdy and weather-sealed. I shot with it in a light drizzle using a weather sealed lens with no problem. I then shot from a boat, in winter conditions that included temps of nine degrees above zero (f) and 35mph winds with blowing snow. The camera never missed a beat. While I still haven’t tested it completely, the MKII also delivers very high-quality video and superb JPEG colors straight out of the camera if you’re into that sort of thing. The Panasonic GH5 is probably a better choice if most of your work is in video, but if you are a stills shooter, the OMD wins hand-down in a comparison between the two because of its quick and accurate tracking AF.

The MKII offers a ridiculous 18-fps frame rate (WITH Continuous AF engaged) which is faster than any flagship DSLR on the market! When shooting birds in flight this has really been handy. In fact it’s generally overkill and most of the time I just dial it back to 10FPS which slightly improves tracking AF performance. 

Olympus has finally offered a second SD-card slot although only the top slot is video/fast card capable. (NOTE: there might be compatibility issues with 128GB cards in the number one slot so check with Olympus to make sure your card works.)

The new High Res Shot mode is not just a gimmick – likewise “pro-capture.” These really work but they do take getting used to. You have to read the manual to find out how to properly set each one up for success.

BATTERY GRIP

I also got a chance to shoot with the dedicated battery grip for the OMD EM1 MK II during my 15-day trip to Alaska. The Olympus HLD-9 Power Battery Grip is a great addition to the new camera for bird photographers or for anyone who shoots a lot of verticals. It mimics the controls that you need to focus and shoot on the grip. It is dust and splash proof and really helps keep the camera under control when shooting vertically. This grip also doubles your battery life, assuming you have one battery in the grip and one in the camera. Now here comes one of my few gripes. I prefer the design where you can put two batteries in the grip. It makes changing them far easier. Perhaps it’s a space limitation or the waterproofing that forces this choice, but the grip misses some of its utility by forcing you to remove it to change the battery in the camera. My work around is to look at the grip battery as a spare. I get more shots in the field and then charge that battery first. It does add some weight and mass to the camera which in my personal case is a good thing but you may not feel the same way.

DINGS

What don’t I like about the new OM-D? There’s not much to complain about. When you’re an early adopter (I received one of the first of these to ship) there are inevitably things to work out. So far I am not in love with the fact that you can’t enter playback mode while the buffer is full. I still think the menus are a bit too much. Less is more and a simpler camera interface would be welcome. The buffer fills a bit too quickly for my taste (but then again I am used to the Canon 1DX MK II which has NO LIMIT on its buffer.) The shutter button is almost too sensitive. I am sure I will get used to it but I accidentally fired off a couple of bursts more than once (it’s only digital so I don’t have to pay for it at least!) I would love an ISO button amongst all the other buttons on the MK II, but these are the kind of minor annoyances you tend to notice most when you are new to a system.

Part of the problem is that the manual that comes with the camera is pretty thin but if you dig around on the Olympus site you should be able to find a digital copy of the REAL manual that better explains things. The camera is very expensive for a Micro Four Thirds camera body, but I didn’t say it isn’t worth the money. I think it is worth the money. Unfortunately, if you don’t have the money it doesn’t matter if it’s a great camera. The price point will send some photographers elsewhere.

CONCLUSION

This is a fast-handling camera that has every pro feature you can imagine. It’s expensive but I think it’s worth the price. It’s also smaller and lighter than its DSLR counterparts. It’s good enough that I can use it instead of the heavy, bulky full-frame DSLRs I used to have to rely on. It works with some fantastic Olympus glass but as a bonus, also works with the superb lenses produced by Panasonic for the M43 system. The main thing I can’t get over is how small, and light weight the kit is in comparison to my usual stuff. It may seem like a heavy rig to those of you who are not wildlife photographers but it’s amazingly light weight to me. I have switched to an all-Olympus workflow. That is not something I expected to happen but for now it’s just the easiest way for me to shoot. I think that is the highest recommendation I can give any camera.

Picture
Picture
Picture
Picture
In this series of four images the eagle starts on the perch and then flies off the perch directly at me. This is the toughest test any autofocus camera can face. An object moving directly toward the camera, especially at a high rate of speed, is the hardest thing for the autofocus to grab. Shooting at f/8, I didn't have tons of depth-of-field, but all four images are in sharp focus proving that the OMD EM1 MK II is up to the task of AF tracking birds in flight.
21 Comments

4/15/2017 0 Comments

​Airport Helipak V2.0 Backpack First Look

Picture
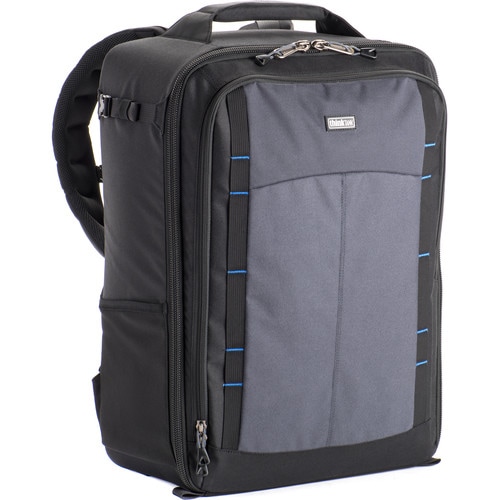
I just got my first drone. And that of course means I need my first dedicated drone camera bag. Enter my good friends at Think Tank Photo who make some of the finest camera bags in the world and their new updated Think Tank Photo Helipak Backpack V. 2.0 has just been upgraded to fit my drone which is the DJI Phantom 4.

Like all Think Tank backpacks this one is comfortable, well-designed and very sturdy. It’s been specifically redesigned to fit the Phantom 4 but based on my best estimate, it should fit any similarly sized drone just fine, DJI brand or not.

One of the first things I’ve learned about drones is that they have even MORE accessories than the average camera and thankfully, the Airport Helipak has room for all that stuff and even has a dedicated 15” laptop compartment.

The new design is carry-on compatible for both U.S. domestic or international airline travel. Its custom divider set allows maximum room for extra accessories and gear.

According to Doug Murdoch, who is Think Tank Photo’s CEO, “We updated the backpack to carry a DJI Phantom 4, a 15” laptop, controller, GoPros, chargers, spare rotors, extra batteries, jacket, tools, and more. The contoured adjustable harness with lumbar support, articulated air-channel, removable padded waistbelt, and height-adjustable sternum strap enable comfort for travel into remote areas.”

While I am personally unlikely to be traveling to many truly remote areas, the jungle known as today’s modern airport is just about the perfect proving ground for testing one of these bags. When you’re traversing an airport (or the open road) one thing that is very important is weight distribution and as usual, Think Tank has figured out how to do that just right with the new Helipak. After roaming SeaTac Airport all day with this bag on my back I wasn’t at all tired.

THE DETAILS

Like all of Think Tank’s camera bags, this one uses the best YKK RC Fuse zippers, 1680D Ballistic nylon bottom panel, metal hardware, and nylon webbing are the most durable, long-lasting materials on the market.

There is the usual side pocket for tripod attachment or water bottle and did I mention plenty of room for accessories inside?

Think Tank offers see-through mesh pockets for small accessories: rotor blades, screwdriver, cables, and just about anything else you can think of. NOTE: TSA was very invested in my supply of batteries and extra rotor blades so be prepared to make sure you are following all airline rules when you pack this thing up. Just because the bag can hold it doesn’t mean TSA wants you to bring it.

Another feature I like about ALL Think Tank bags is their handles. While this may be something that doesn’t seem that sexy to many of you, it’s one thing that matters a great deal to me. I have had bags fail at the handle. And even if they don’t fail some are so darned uncomfortable that they might as well fail. After all you will be grabbing these handles to pull the bag from overhead bins, car trunks, and gear closets. It needs to be solid AND comfortable and I can attest that the handles on the Airport Helipak V2.0 Backpack are both.

​

OTHER FEATURES

The bag is water repellant, has ultra-stretch pockets, Y-buckles and antique finish metal hardware, big hole air mesh, nylon webbing, and 3-ply bonded nylon thread.

PRODUCT SPECIFICATIONS

Exterior Dimensions: 13.6” W x 19.7” H x 9.3” D (34.5 x 50 x 23.5 cm)
Interior Dimensions: 13” W x 19” H x 8.3” D (33 x 47.8 x 21 cm)
Laptop Compartment: 12.6” W x 17.3” H x 1.4” D (32 x 44 x 3.5 cm)
Weight (with all accessories): 4.6 lbs. (2.1 kg)

CONCLUSION

I have never been disappointed by any bag made by Think Tank Photo and when I am torn between two brands, finding similarly situated bags, I almost always opt for the Think Tank brand because they just work.

HIGHLY RECOMMENDED!

You can order the Airport Helipak V2.0 Backpack from our partners at B&H.

0 Comments

4/14/2017 0 Comments

Welcome to the more gear show page at PPN

Picture
By Scott Bourne

Marco and I do a podcast together called "We Shoot Mirrorless." We've been doing podcasts about mirrorless cameras for about two years in various places. But sometimes I want to talk about other kinds of camera gear or go into more detail on the mirrorless stuff so that's what this new show and blog will help me do. The More Gear Show will air monthly here at PPN and I'll regularly update this blog with random gear reviews that I hope you enjoy. So stick around because everyone needs more gear!

0 Comments

    Archives

    May 2018
    September 2017
    August 2017
    July 2017
    June 2017
    May 2017
    April 2017

    Categories

    All Contests GearGuide More Gear News Podcasts Reviews Tutorial

    RSS Feed

Copyright 2017 - 2021 - All Rights Reserved